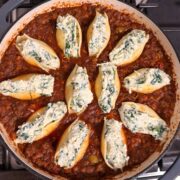
Stuffed Pasta Shells with Meat Sauce
Stuffed pasta shells with meat sauce are the ultimate Italian-American comfort food. Tender jumbo shells filled with creamy ricotta cheese, baked in a rich beef bolognese sauce loaded with vegetables and herbs.
Servings: 8 servings
Calories: 399kcal
Equipment
- 1 sauce pot for cooking pasta
- 1 braiser for cooking meat sauce
- 1 strainer to drain pasta
- 1 grater for grating Parmesan Cheese
- 1 Food Processor for shredding mozzarella and provolone
Ingredients
- 2 tablespoon achiote oil
- 1 lb ground beef
- 1 onion peeled and small-diced
- 1 carrot peeled and small-diced
- 2 stalks celery peeled and small-diced
- 1 cubanelle pepper seeded and small-diced
- 3 sweet peppers (optional) seeded and small-diced
- 1 tablespoon garlic paste or 3 garlic cloves
- 2 tablespoon sofrito
- 2 tablespoon tomato paste
- 1 oz Worcestershire sauce
- 1 can diced tomatoes
- 2 teaspoon capers small buds, optional
- 12 Manzanilla olives rough chopped, optional
- 1 box of Jumbo Shells
- 15 oz Ricotta cheese tub
- 1 cup Parmesan cheese
- 1 ½ cups shredded Mozzarella cheese
- 1 egg optional if needed
Instructions
- Preheat your oven to 375℉. Have all your ingredients prepped and ready: sofrito, vegetables diced, cheese mixture combined, and pasta cooked and drained. This makes the assembly process smooth and efficient.
- Heat achiote oil in a large skillet over medium heat. Add diced onions, peppers, carrots, and celery. Sauté until softened and fragrant, about 8-19 minutes. This aromatic vegetable base (sofrito) is the foundation of flavor that makes your meat sauce so rich and complex.2 tbsp achiote oil, 1 onion, 1 carrot, 2 stalks celery, 1 cubanelle pepper, 3 sweet peppers
- Add the ground beef to the pan with the vegetables. Break it up with a wooden spoon and cook until browned, about 6-8 minutes. Add the Worcestershire sauce, garlic paste, Puerto Rican sofrito, and tomato paste. The tomato paste adds depth and helps the sauce cling to your stuffed pasta shells.1 lb ground beef, 1 tbsp garlic paste, 2 tbsp sofrito, 2 tbsp tomato paste, 1 oz Worcestershire sauce
- Stir in the diced tomatoes, olives, and capers. If the sauce looks thick, add a splash of beef broth or red wine; the vegetables will render some liquid. We do not want the sauce too liquid. Bring the heat to low and let it simmer for 20-30 minutes, stirring occasionally and adjusting the flavor and thickness as needed.1 can diced tomatoes, 12 Manzanilla olives , 2 tsp capers
- Cook your pasta (the pasta can be cooked the day before). While the pasta and sauce cook, combine the ricotta cheese, shredded mozzarella, grated Parmesan, chopped fresh basil, one beaten egg, salt, and pepper in a large bowl. Mix gently until well combined but not overmixed. You want it creamy and scoopable. The egg helps bind everything together, keeping your ricotta-stuffed pasta filling perfectly intact.1 box of Jumbo Shells, 15 oz Ricotta cheese tub, 1 cup Parmesan cheese, 1 ½ cups shredded Mozzarella cheese, 1 egg
- Using a spoon (or small cookie scoop for easier portioning and consistency), generously fill each pasta shell with the ricotta mixture. Don't be shy, pack them full! Each shell should have about 2-3 tablespoons of filling. The filling will set as it bakes.
- Spread about 1 cup of bolognese meat sauce on the bottom of a 9 x 13-inch baking dish. This prevents sticking and adds flavor to the bottom of eachshell. Arrange the stuffed pasta shells in a single layer, opening side up. Spoon more bolognese sauce around the shells.
- Cover the baking dish tightly with aluminum foil and bake for 25 minutes. This allows the shells to heat through and the flavors to marry. Remove the foil and bake for an additional 10-15 minutes until the cheese is bubbly, the sauce is bubbling around the edges, and the tops of the shells are lightly golden. Let rest for 5 minutes before serving; this helps the filling set and makes plating easier. Serve 3-4 stuffed jumbo pasta shells per person and watch them disappear!
Notes
- Prevent watery stuffed shells: Make sure your ricotta is well-drained, don't add too much sauce before baking, and ensure your cooked shells have no water trapped inside. Pat them dry with a towel if needed.
- Make it ahead: Assemble the entire dish up to 24 hours in advance, cover tightly with plastic wrap and foil, and refrigerate. Add 10 extra minutes to the covered baking time if baking straight from the fridge. The stuffed pasta actually tastes even better the next day as the flavors develop!
- Freeze for later: These beef-stuffed pasta shells freeze beautifully! Assemble in a freezer-safe aluminum pan, cover tightly with plastic wrap and two layers of foil, and freeze for up to 3 months. Thaw overnight in the fridge before baking as directed.
- Serving size: Plan for 3-4 stuffed pasta shells per person as a hearty main course, or 2-3 if serving with substantial sides like garlic bread and salad.
- Leftovers: Store in an airtight container in the fridge for 3-4 days. Reheat individual portions in the microwave (1-2 minutes on 50% power) or the whole dish covered in a 350°F oven for 20 minutes.
- Equipment I use: I make this recipe in my [9x13-inch ceramic baking dish - affiliate link]. Ceramic distributes heat evenly, prevents hot spots, and looks beautiful going from oven to table. You could also use a disposable aluminum pan for easy cleanup or gifting.
Nutrition
Serving: 3shells | Calories: 399kcal | Carbohydrates: 11g | Protein: 27g | Fat: 28g | Saturated Fat: 14g | Polyunsaturated Fat: 1g | Monounsaturated Fat: 10g | Trans Fat: 1g | Cholesterol: 113mg | Sodium: 625mg | Potassium: 519mg | Fiber: 2g | Sugar: 5g | Vitamin A: 3431IU | Vitamin C: 66mg | Calcium: 406mg | Iron: 2mg
