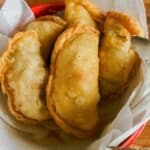
Puerto Rican Empanadillas
Savor in the irresistible allure of Puerto Rican Empanadillas, where flaky golden pastry embraces a savory symphony of seasoned meat fillings. Portable and customizable, these mouthwatering Puerto Rican Beef Turnovers are the perfect fusion of convenience and culinary artistry.
Servings: 12 empanadillas
Calories: 138kcal
Equipment
- Thermoworks Chef Alarm
- Deep Frying Pan
- Rolling Pin
- Paper Towels to absorb excess oil
Ingredients
- 2 cups flour
- 1 teaspoon of table salt
- 2 teaspoon of baking powder
- 6 tablespoon of vegetable shortening chilled
- ½ cup of chilled water
- 1 egg for egg wash
- 1 tablespoon water
To Fry Empanadas:
- 1 part Frying oil peanut, corn or vegetable. enough to cover the empanadillas
Instructions
- Sift the Flour, salt, and baking powder.2 cups flour, 1 tsp of table salt, 2 tsp of baking powder
- Cut the fat into the flour mixture with a knife, whip, pastry knife, or a food processor with a dough hook. You want it to have the consistency of peas.6 tbsp of vegetable shortening, ½ cup of chilled water
- Add small increments of water until the mixture comes together into one mass.
- Knead the mixture until it forms a ball—place in a bowl and cover. Let rest at room temperature for 30 minutes.
- Dust the table or work surface with flour. Lightly cover the dough with flour and begin to roll dough into a log, about 2 inches in diameter.
- Cut the roll into 1-inch pieces. If the ends of the roll are tapered, you may cut those larger than 1 inch.
- Roll the dough pieces into small discs using a rolling pin or tortilla maker lined with parchment paper. Avoid making them too thin, or they will rip during assembly. As you make your disks, layer them with parchment paper and place them in a baking pan. Once you have finished making all the discs, place the discs in the refrigerator for a few minutes to keep the fat from melting prematurely.
- While the disc chill for a bit, make an egg wash of one part egg and one part water.1 egg, 1 tbsp water
- Place a portion of picadillo or meat filling on the bottom half of the disc. Leave a margin at the bottom half of the empanadilla for the top half to make the joint. Using your fingers or a brush, brush egg wash on the edge of the disc.
- Fold the empanadilla and crimp using a fork. You may use an empanada press. When using a fork, move the fork tines along the edge of the empanadilla and equally space the crimps.
- Deep fry or bake your empanadillas to a golden brown. For Deep frying: Use a cooking alarm to maintain the temperature of the oil and a deep frying pan. Bring the oil to a temperature of 350℉. Once the temperature is reached, add a few empanadillas to the oil one at a time. Be careful not to crowd the empanadillas in the oil. Cook until golden in one side and then flip to the other side. Once the empanadillas are nice and golden, remove them from oil and place them on a plate with paper towels to absorb excess oil.For Baking the empanadillas, Preheat the oven to 350℉. Line a baking sheet with parchment paper and arrange the empanadillas 1 inch apart in all directions. Bake for 20 minutes or until golden brown.
Notes
-
- Immersion Thermometer: If you have a small kitchen as I do, you might not have room for the plethora of gadgets and equipment available in the market. An immersion thermometer will help you to deep-fry any item in a sauce or frying pan. It will also help you keep the temperature in roasts in the oven. I trust my Thermoworks Chef alarm for these tasks.
-
- When frying in a saucepan or frying pan. Do not fill the oil to the top. The oil will rise, expand, and bubble once you add the item you are frying. As the temperature of the oil levels off from the offset of adding the product you are cooking, the oil will return to its original level. Overflowing hot oil could cause a fire or bodily injuries if not handled appropriately. Always be careful when frying, even if using a small deep fryer.
-
- Make your discs or assemble empanadillas the day before, if possible. Layer the discs with parchment paper and allow them to rest covered in an airtight bag in the refrigerator.
-
- Before using, let them come to room temperature slightly before assembly. For already assembled empanadillas, they could be fried or baked while cold.
-
- Make your discs or assemble empanadillas the day before, if possible. Layer the discs with parchment paper and allow them to rest covered in an airtight bag in the refrigerator.
-
- Frozen discs can last up to 3 months in the freezer in an airtight bag. If you already have the empanadilla discs in a ziplock bag, you may freeze them after refrigerating them for about 2-3 hours. Refrigerating them before freezer eliminates ice crystals from forming.
Nutrition
Serving: 1Empanadilla | Calories: 138kcal | Carbohydrates: 16g | Protein: 3g | Fat: 7g | Saturated Fat: 2g | Polyunsaturated Fat: 2g | Monounsaturated Fat: 3g | Trans Fat: 1g | Cholesterol: 14mg | Sodium: 271mg | Potassium: 28mg | Fiber: 1g | Sugar: 0.1g | Vitamin A: 20IU | Calcium: 45mg | Iron: 1mg
